Showing posts with label Terrain. Show all posts

Tuesday, December 2, 2025

N:AW Octarius Ork Scap Piles for Necromunda

 Back in August, I revealed that the kid and I had been working on Necromunda: Ash Wastes (N:AW from here on), both as a modeling project, and for gaming.  To recap, N:AW is the "outside" version of Necromunda, with vehicles, and the namesake ash wastes.  An ash waste game mat was built next.  The kid handled the terrain from the box, plus more buildings, plus made a bunch of rocky outcroppings from card and spackle.  

To contribute I got the newish Games Workshop plastic Ork Scrap piles from Ebay, scraped or clipped some of the "Ork" guff off, and daubed some paint on them.  The nice thing about painting scrap heaps is that the paint job does not have to be great because it is garbage, and then you are going to wash and otherwise cover over the paint anyway.  I finished these over the Thanksgiving break, and here they are. 

Overview of the three piles, three barricades


Escher ganger for scale with a barricade


Overhead view of the pieces so you can see how large they are against a 25mm base (center)

Anyway, lovely little project, and perfectly suited for drifting in and out for little bits of painting.

While I was working on the formerly Ork pieces, I also finished these Necromunda plastic barricades, which I had previously sponge painted. Here I just added a ton of washes and some "rust", which is a bit bright. 

Seven smaller barricades with Escher ganger for scale

Pleased about all this terrain, although it might benefit from a light filter and satin sealer. 

Plenty more Necromunda to come, just need to either paint it or blog about it. 

Friday, August 8, 2025

N:AW Ash Wastes Game Mat

So something that you need for a Necromunda Ash Wastes (N:AW) game is in fact "ash wastes", that is a playing surface.  Your usual green felt or shattered future city is not really applicable.  N:AW has effectively two game scales, one which is the usual Necromunda scale skirmish, which you play on a 3x3 foot or 4x4 foot board, and "rolling roads" where there is some sort of vehicular chase/heist/etc. which needs a 6x4 foot or two boards that you switch to represent the road passing by. The boxed set came with a rather nice 3x3 foot printed paper mat, which has a day and night side, but it is glossy and already showing a bit of wear at the folds.  So the idea came to make a new game mat to represent this surface, and more to make it from a new technique. [who would be smart enough to use a tried and true technique?]

Googling around for various ash wastes mats, I somehow came across this video from Black Magic Craft.  He has a few more videos that use this same technique to make roads and rivers, which might have been where I found it the first time. 

I really liked how it seemed heavy and dense compared to caulked canvas, and the idea of using rollers and other things to mark the caulk seemed like a good one.  So after some research, I found a similar runner from Lowes (the same product as the video is not sold at Home Depot in the US), bought some caulk, and got to work.  

So to learn how to make one, continue after the jump. 

Wednesday, August 12, 2020

Beaux bâtiments en normandie - part 1

To have a good miniatures game, you need rules, miniatures, a surface to play on, terrain, and various accouterments (dice/cards/counters/markers etc.).

For World War II skirmish games I had the first three, but was lacking the third. Since I knew that the forces I was collecting were roughly centered on "late war" and more specifically Normandy (with the paratroopers in the earlier uniforms), I thought that Northern France would be a good place to start.

Now, as you know, Normandy is about as well trod a war-gaming ground as you can find.  D-day, and the months following have built up about as much mythology as you can for something so recent, and of course the terrain itself lends itself to smaller actions, which are easier to war-game on the tabletop convincingly. (even if large actions lend themselves to greater historical accuracy...)

So Normandy terrain.

Fortunately as mentioned above this is a well hoed row, and there are plenty of inspiring builds out there.  In addition, there are plenty of commercially made items for sale, and a plenty of photo-graphical evidence as well, since both the Commonwealth and US armies were accompanied by photographers and other journalists.

A rational person, or at least one not so cheap as I am, would view the above, and then go to some MDF laser cut shop and buy a small village, customize that a bit, and move on.  Not being rational, and being cheap, I went another route:

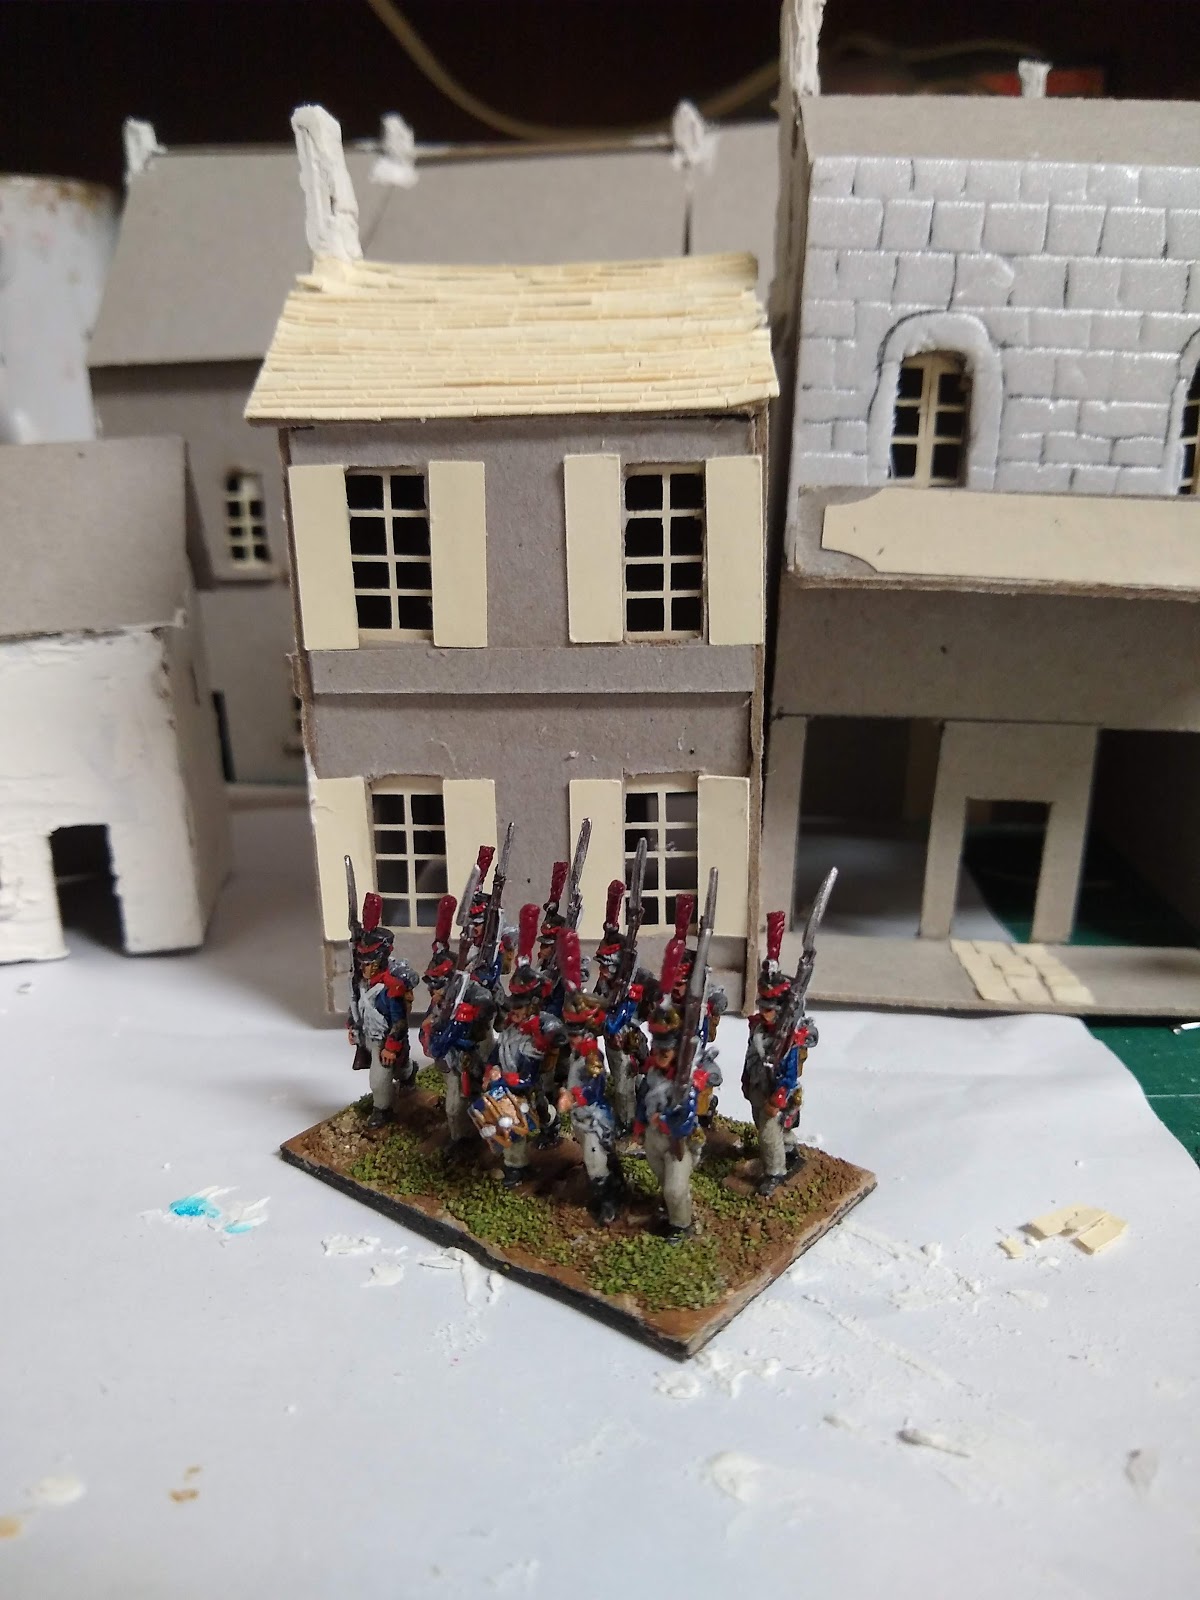
Unfortunately I did not take any pictures of the first couple buildings at the early stages of construction, but here you can see on in progress to give you an idea of how these went.  Card stock carcass, card and paper details, and modeling putty "skin".   Other buildings got a skim coat of drywall jointing compound, and a couple got foam sheet stone work.

After a "few" hours we end up here:


Then it came time to do shingles...


I cut a bunch of these out on the Silhouette Cameo we have (as well as the windows, shutters and other details), but they covered only one half of one roof, and then I laboriously cut out most of the rest of the strips by hand.  As you might expect, making the same motion over and over again hundreds of times is not great for the ol'muscular-skeletal system, and with eight buildings to cover it took a long time. 

Scale check

The nice thing about old buildings is that they can be used in many eras...
Throughout this project I collected pictures on the internet and printed some of them out, made sketches, doodled in the margins of other things, and otherwise compared terrain to the actual thing.  Google street view came in handy as I "drove" around Normandy looking at old villages and farm roads. I even had my sister send me some vacation pictures she had taken from one of her trips to Normandy (brother-in-law is a Band of Brothers fanatic).


Lots more to come on these buildings!

To be continued:

Tuesday, January 28, 2020

Terrain Mat part Three

Part Three you say?  I previously posted a Part One, and then Part Two was buried in my Christmas/New Years post.

To recap, my wife found an old Ikea painting for free, and after quite a while I got the go-ahead to make it into a terrain mat.  In Part One my children helped with the initial smearing of caulk and spreading of flocks and static grasses.

In part two, I fixed some areas where the caulk had come off, and spread the caulk+ coffee for the road, and the caulk for the river, and then scattered some model railroad ballast.

In Part Three I worked on the mat by myself, as everyone else was doing their own outside art projects.

I first got out some green ink and future, and made  up a wash for the river bed.  This used up a lot of paint, and I think it turned out to be too green, but it should be fine under the clear caulk.

Second, I painted over all the bare portions of the mat.  Some of them came from places that the flock did not stick to the caulk, but rather more were where the caulk itself did not stick.  Very concerning.

Anyway, the paint seems a bit light to me, so I might go back and hit those with a brown wash, or alternatively plant some tufts there.

After that I got out an old spray bottle head, and a Starbucks coffee cup and made a rather cheap spray bottle for applying watered down PVA to the flock.  I had to make up a bunch of loads of the mix, so hopefully it helps keep the flock on.

Terrain mat as it looked on Sunday
Next time I expect to apply the clear caulk, and maybe get a cheap can of mat sealer for the flock issue.

Monday, January 6, 2020

Happy Christmas/New Year

Happy Christmas and Happy New year to you all.

I hope Santa/Krampus/Your Paypal account brought you what you wanted this year.

I have been rather busy for the last month, with a conference in Chicago, being sick for a week, and then taking nearly two weeks off from work to be with the kids.

For Christmas this year, I, er Santa, got everyone in the household miniatures from Reaper for their stocking.  Reaper, as is usual for the season, was running a few promotions, so I got a few extra things too:
Reaper Christmas 2019
Specifically, in addition to free shipping, I got a free miniature of the month (Genie coming out of a lamp), a free pack of holiday figures (I selected the Christmas familiars because my wife loves polar bears), and a Christmas Sampler pack.
Candy and miniatures (plus paint and an ornament)
The sampler pack I, er, we got had a Santa miniature, an ornament, two paints, three bones figures, and some candy!

For Christmas, I did unexpectedly well, and got the D&D Essentials set from my sister, and some X-wing stuff from my Wife.  She also got me a subscription to White Dwarf, although that will not show up for a while.  Santa also got a number of Reaper figures to stuff into my stocking.

Somewhat unexpectedly, my son got First Strike, the miniature starter for 8th edition Warhammer 40k from his grandmother, so there has been a lot of talk about Warhammer in the house lately!  He has already read the books, and Christmas morning clipped the figures out and put them together.  Finishing the miniature assembly and playing through the starter missions are in our near future.
Pleased as punch
Boxing day I had a hour or so to work on the terrain mat with my daughter, and we got the roads done, the river bottom painted with its first couple coats, and some rocks added to the ford.
It is really coming along nicely now, and I anticipating it being done with a couple more sessions.  Mainly, I want to glaze some green on the river, and then layer in some clear caulk. Unfortunately the flock is not sticking to the canvas/caulk quite as much as I anticipated, so I am going to have to paint it with a coat of watered down PVA.  In the picture above the regular flock clumps you can see in the lower left are where I was adding another layer of caulk/flock to try and fill in some empty areas where the flock had rubbed off. 

We got away to my Wife's cousins' house for New Years, and in addition to playing a ton of Code Names and In the Bag, we managed another game of Risk Legacy. Unusually, I nearly won, and was back stabbed by those that encouraged me to make some board spanning moves.  Such is Risk!

Finally, at the cousins' house I finally got the chance to use the D&D miniatures that I gave the kids in 2017, and then had to contend with them begging me to play more D&D for the rest of the trip. (and they even were trying to figure out how to play together over facetime!)  First session they asked if they could fight each other, and then split the party after the first encounter...  The kids seemed to have a great time, and it was one of the only things that could drag them away from the Switch they got.

Wednesday, December 4, 2019

Terrain Mat part One

Earlier in November, my family was away for the weekend, and I got little done while they were gone, instead spending time with my sister and playing video games. (Classic XCOM).

When they got home late on that Sunday afternoon, my wife encouraged me to involve the kids in a project that I have been wanting to do for quite some time.

In the spring, a neighbor moved out, and for a few days had a bunch of random wall "art" out in front of their house to give away. My wife picked up the last piece with the idea that she would repaint it with the kids, as she has done with other canvases in the past. However, like many projects, no progress was made for a while, and the painting lived in the garage.

After several months, we pulled out the painting, and put it in the backyard where kid painting occurs. The paint was basically falling off, and we began to peel it off as we were doing other things.

After a few weeks of it sitting around, I got serious about peeling off the paint, and realized that it was sticky on one side... was it glued?  A quick soak with the garden hose proved that it was, and everything came off much more quickly after that.

So now we have a 91x119 cm blank canvas, and my idea was to make it into a play mat.

The kids were enthusiastic once they got into the idea, and they wanted to make a design with a road and a river (the maps of the battle of five armies and the battle of the Hornburg I had showed them may have influenced this a bit).

With a pen, they sketched out a plan on the canvas, and then I had my son measure the road segments so that they would be approximately 40mm wide (suitable for a 15mm dirt road or a Warmaster base)

After that we gloved up, and started mixing caulk and paint and smearing it on.  After slapping on a section of caulk, we then sprinkled a relatively heavy coat of the primary flock, followed by dustings of other flocks, static grass etc.  I then crudely rolled it in with an empty caulk tube, although this was not very successful due to the canvas still being on the frame.  Unfortunately no pictures of this phase, my hands were too dirty, and my wife was busy.

After less an an hour (and one change of clothes for the kids), we got to this stage:

You can see here that there are quite a number of colors, and some texture imparted by the caulk.  The roads and river are currently unfinished. After this dried for a few hours, I carefully dumped it off onto newspaper, and put it in the garage to await the next step. The flock and such dumped off was recovered, and equaled about 60% of what went on in the first place, more because of all the other flocks added than because it all fell off!

Tools used:
Paint stirring sticks
plastic tub from the recycling bin

Supplies used:
Two cans of paint, matched to GW Scorched Brown, and Vallejo Earth
Two tubes of flexible paintable caulk
One bag of flock
Various other flocks, static grasses, and herbs

Next step: have enough time to do the road and river sections.

Thursday, June 1, 2017

3d Printing II

In the midst of my extremely busy week last week, I managed to get a bit of time to head down to the downtown branch of the local library and try out their new maker lab.

The lab just opened less than a month ago, and aside from open hours, they also will set up appointments to meet with people anytime during the day.  They have two Makerbot Replicator +, machines which are fairly large, and faster than the older models at the other 3d lab in the library system.  Both of the labs allow you to print without cost, although they do recommend that users donate filament if they are using the labs frequently.

After a bit of an adventure finding parking, I met with the assistant librarian in charge of the lab, and loaded up a model I created in TinkerCAD.  This model is a building facade, designed to fit three buildings wide on a 8 inch frontage.  In actual terrain building, I would probably cast these in plaster, and attach them to a carcass for strength. As the model is not very large, it printed in approximately three hours, most of which time I was absent reading a book.
First layers of the raft being laid out

About an hour later

Final product, still with raft

Detached from raft, and compared to my usual test figure
Some numbers:
   Time to print ~3 hours (and about 10 minutes to set up)
   Material used (with raft) 43g
   Material used (without raft) 26g
   Cost of a 1kg spool of PLA ~$22
   Cost to print this model (if I paid for material) $0.95
   Actual cost: $20 for parking
  Comparative Shapeways cost: $21.89

Now I want to finish this model with some sanding and filling, and ultimately see how well it casts.  As I have another dozen or so models already finished in TinkerCAD, I am already trying to figure out when to go down to the library again...

Wednesday, November 16, 2016

Coffee Box Buildings


As I mentioned in prior posts, I expected to play a game or so of 40k and so I cast about for some scenery for the game.  I have a few plastic buildings, but I wanted something a bit more futuristic, and more colorful than unpainted plastic. A year ago, I worked on some ideas for turning waste boxes from our work coffee machine into buildings, but discarded the idea as not workable due to the size and condition of the boxes.

This time however, I was in a time crunch, so I made a "skin" for the buildings in MS Publisher, printed the skin and stuck it on. You can see version one without the balcony floor, and version two with it.

I think the results are ok (certainly enhanced by the graffiti), but more as LOS blockers than as playable terrain. These never saw the table (we played x-wing all weekend instead) so they are dust collectors for now.

Friday, June 24, 2016

Urban Debris

Suber showed off his finished multi-building block a while back, and in commenting on the painting and weathering (which is seriously good, go check it out), I suggested "you could make a mix of paper bits, sand, and some baking soda with glue, and just sort of smear it into the corners and edges."

Now, afterwards I got to thinking.  Was it fair to suggest that he do something to his lovely buildings without first hand knowledge of the results?  After all, I imagined that it would go well, but I had never done it myself.

So, the next day at lunch, I knocked together a little photo background using some super glue and various paper and card found in my office.  I then painted it, and like all projects of mine, it sat waiting for some free time to appear.
Here is the background without the added litter
When that time arrived, I printed out some collected posters and newspapers to mix with some sand, baking soda, paint, and glue to apply to the photo background, just as suggested to Suber.

As it turned out, I did need to repaint the litter concoction, which is why it took me so long to get this posted.  Adding a bit of paint, ink, and pastels on the top of the litter really helped, although I could have probably mixed those in the beginning to save time.


I think that it took about an hour worth of time to build and paint the photo-background (most of that agonizing over the graffiti), and about 10 minutes to do the litter.  I think it adds to the look of the piece though, but what do you think?

Friday, January 1, 2016

A little bit of Theater - Part 5

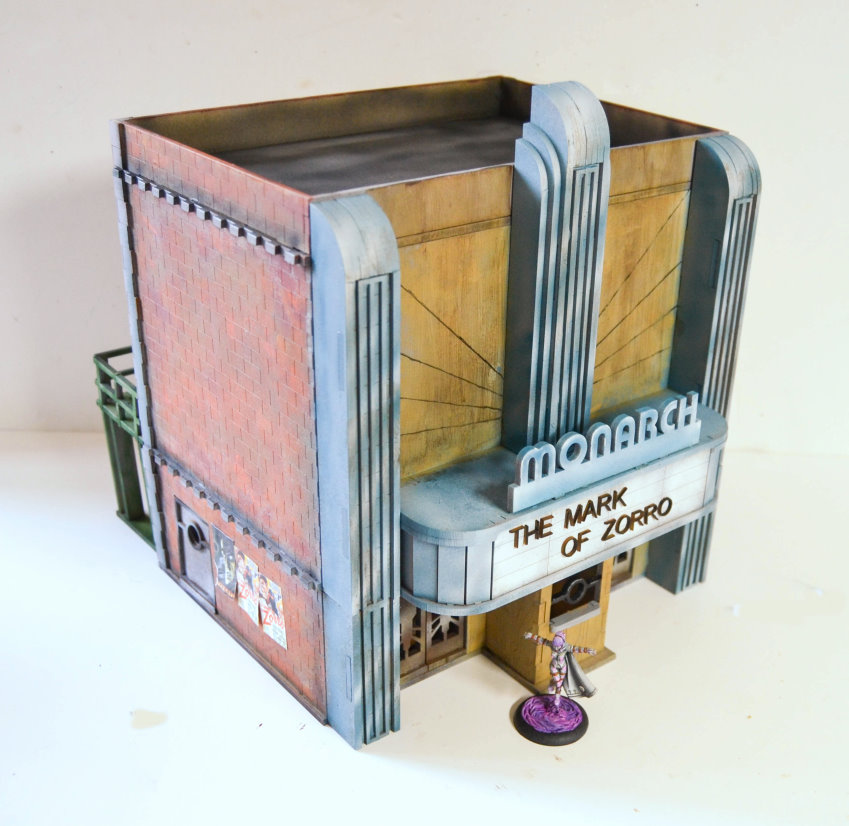
As you no doubt read in part one, two, three, and four, I ordered the Monarch Theater from Multiverse to build as a gift for my wife.

Now we are coming into the final stretch, the time right before Christmas where I panic and cut down on sleep in order to get this thing finished. With various family commitments and events, I estimate that I have only a few hours of time before Christmas arrives, so this is going to come down to the wire. (as always). As it happens, this year I have a cold, and it will be very hard to squeeze out any more energy, so we will see if I can finish or not.

No painting pictures from this one, but I do have one of the nearly complete theater in its eventual place.
Test placement on the bookshelf
When I was putting it together for this test, I realized that the leading stroke of the "C" was touching the wall in such a way as to prevent the marquee from seating correctly, so I will have to shave that down.  Still to come: weathering for the building, interior work, and the inevitable touch ups.

Thursday, December 31, 2015

A little bit of Theater - Part 4

As you no doubt read in part one, two, and three, I ordered the Monarch Theater from Multiverse to build as a gift for my wife.

With the theater built and spray coated, I found myself unable to work on it for a few weeks. As I write this, I am frantically painting this in an effort to get it done by Christmas, and have had several painting sessions with the main body and details to that end.


The picture above is the first painting session, and shows a selection of the craft paints I am using.  I remained surprised at just how much paint the HDF sucked up, as I had to paint some sections two or three times to get an even coat.  On the "stone" work I used this to my advantage, as the mottled look of partly absorbed paint gives a good look I think.


In this picture, I am using tissue paper and black paint to make a tar paper roof.  Common in this area, tar paper (or felt) is rolled out on flat roofs, and sealed with tar on the edges, and sometimes has a gravel overlay.  Given our climate, the blackish paper turns light gray very quickly, and older roofs are nearly white. Anyway, this technique is one I read about in model train forums, and it is both very quick and very cheap.  I can go into more detail if anyone is interested once this is all done.


Here is more work on the tar paper (still needs some weathering), and the finished marquee with a few coats of glow in the dark varnish.  It is pretty old, so I am not sure it will work, but if it does it should be a nice surprise effect behind the black text.


Int he above picture, I have painted the second segment of the building with its first coat. The rear of the building is still separate to allow me to work on the interior. I remain surprised (somehow) at how much paint gets absorbed by the HDF, with many segments taking more than one coat to establish color, even over the spray paint. .

Wednesday, December 30, 2015

A little bit of Theater - Part 3

As you no doubt read in part one and two, I ordered the Monarch Theater from Multiverse to build as a gift for my wife.

I left the build last at the point of completing major construction, about 3 hours into the project. During my third annual November hobby weekend, I managed to sink a great deal more into the project, totally completing construction, interior work, some detailing, and then spray painted the lot.

I also ran into my first two problems.

First was due to the lack of instructions (at the time of this writing now provided on the Multiverse site)

As you can see here, the sides of the marquee are built of fiber board and fiber card.  However, they do not reach from the top to the bottom of the piece.  Here, the top is just resting on the side pieces.  As it turns out, there are small curved pieces of fiber board that connect the card and board together to complete this section of the building, but I am not sure why they were not simple joins.

The second problem was revealed during the build of the platform and staircase.

It might be a little hard to see here, but the center leg of this railing piece is bent into place because it is about a millimeter off.  I thought laser cutting was supposed to avoid these things?  Anyway, it worked out in the end.

Stylistically, the stairs are not my favorite, as they are a bit steep, and have pretty high railings, as can be seen in the picture below (with the baneblade officer as a handy scale figure)

I spent a ton of time on the interiors of the building, including hinging a couple of the doors.  This reinforced my belief that I am not very good at scratch building, and that "measure twice, cut once" appears to be particularly pertinent when you are fatigue drunk, and really should have stopped cutting new material.  So let us skip over that until I am able to get back in there and clean it up.

I spray painted the exteriors with a cream spray, reasoning that it would make a good background color for an art deco building.  As I had read about online, the MDF seemed to absorb quite a bit of the spray, either that or the cream spray was not very covering. Also seen in the picture is a scratch/junk built air conditioner unit, which seemed necessary to dress up the roof a bit.

Tuesday, December 29, 2015

A little bit of Theater - Part 2

As you no doubt read in part one, I ordered the Monarch Theater from Multiverse to build as a gift for my wife.

After a couple of weeks, my wife was out of town for an evening, and the kids were asleep, so I was able to put in some time, and here is where I got:

Decorative pillar with three pieces of MDF, and a card overlay for added detail

Floors coming together

This is going to be a tall building (206mm)
I glued everything with plain old white glue, applied with a toothpick

These windows, while odd in a theater, are nicely made of three layers of MDF and card
I apparently did not take a picture of my stopping point, but I did get all of the decorative pillars attached, and now just need to work on the marque and the rear staircase.

Thoughts:
  • There were no instructions with this kit (at the time of writing forthcoming to the website), but I was able to puzzle out where most of the parts went pretty quickly.  Years of model and LEGO building pay off! 
  • The detail was engraved nicely, and I hope it lasts through painting. 
  • All of the cuts were very clean, and some of the pieces more or less came out on their own. 
  • The scale of the building listed on the website is 28-35mm, and it is clear that some aspects of this kit are aimed at the larger side of things. Windows and the ticket sellers booth in particular are clearly aimed at taller models, although the doorways are a bit wide and short for regular 28mm miniatures, and would seem too small for the larger figures. You can see this in the third picture, which has my converted Necromunda Bounty hunter in the shot for scale. Even with a base, the ticket booth is too tall for him, and the doors are a bit short. 
  • I am not a fan of the way the doors are handled (an attached flat bit on the bottom),and plan to replace them with some sort of hinge. I do think that it makes them playable very quickly, which for most people is probably key. 
  • Construction took me about 3 hours to complete the major building and its decorations, which would have been about 2.5 hours if I had instructions, and probably less if I had built a laser cut building before. 
Stay tuned next time for more pictures of this build. 

Monday, December 28, 2015

A little bit of Theater - Part 1

Stock Kit from the Multiverse Website
In September, I saw a notice that Multiverse Gaming Terrain was selling a new Monarch Theater kit, and further, that you could get a custom cut name for it for only 3.95 Euro.  I immediately thought about buying and building it for my wife, which may seem a bit strange.  Let me explain.  My wife is a film major, and loves movies, as well as Art Deco theaters, so that part seems to fit nicely. She also has been dreaming of making her own movie for a long time (just like every film major), and adding a custom marque for the title of her dream movie seemed like a good thing to do.  I decided it would also be good to make use of the custom cut sign and make it look like our local art house theater.


Now, I have never constructed a laser cut building before, and had never ordered from Poland, and was not sure if I could hide such a large kit while I got it painted.  So I stewed on the idea for a while until the kit was actually released, and then decided to do it.  I also went a little bit crazy with some plans to customize and super detail the kit, which I may or may not actually complete... e.g. soldering new scale railing for the staircase.

Once the theater was actually released, I ordered one, and it showed up here on the West Coast just over a week later with my custom cut signs. Multiverse gave me a tracking number, so I was able to watch it travel around Poland and then to the US, which took some of the fear out of overseas ordering.  Everything seemed to be intact, although the envelope was ripped a bit (it might help to have taped the corners). I hurriedly hid it away in my desk before too many questions were asked, and it sat there for an opportunity for construction, which you can read about in part 2.

Monday, November 9, 2015

Hobby Weekend

This weekend past, my wife and kids were out of town, so I had a bit of a hobby weekend (when not working on painting a bathroom, laying brick, or other household chores that seem to accumulate).

Previous years when faced with such weekends, I have built and painted a Tau platoon, and built an IG platoon twice the size of the Tau one (and which consequently I am still laboriously painting).

This year I worked mostly on a project which is still under wraps, and few other odds and ends.  I do not seem to have completed anything, and certainly not all the projects I wished to, so it seems a bit frustrating.

I did get a little bit of work done on an idea which has been percolating around in my brain for a while.

At work, we have a Keurig coffee machine (actually right outside my door) and the pods come in these boxes.
A couple times a week, I see these boxes in the trash, and it got me thinking about reusing them as terrain. As it turns out they are about 4.25 inches wide, and 6 deep, and about 7.75 tall.  To my mind's eye, these started to look like row houses for a futuristic city... however, at 4.25 inches wide, they are too big to fit two houses on the 8" squares I have planned for my city terrain.

Further, the boxes are made from fairly flimsy cardboard, and so not very suitable for a finished building.  I plan to use just the shape of this box, but replace all vertical surfaces with foam-core cut to be slightly narrower than the boxes.  So much for workplace recycling!

I used our Silhouette Cameo, a computer controlled cutter, to make some bitz and templates for the building, which was very interesting, and certainly more exact than anything I could cut with a knife. (as proven earlier that same day when I mangled some foamcore).

The picture above shows a couple of templates I made, window frames for two buildings, and a bunch of vents.  I stacked up the window frames and vents, and with super glue, effectively made them into stiffer hard pieces, suitable for construction.  The hex spray templates are for a set of rooftop solar cells, which I had made out of a magnetic hotel door key and some sort of toy packaging.

Anyway, that is what I did this weekend, what about you?

Wednesday, August 19, 2015

Pavement test

A long while back I had it in my head that I should make a test bit of pavement to try out the idea of using standard wall filler as a pavement/road.  The idea was that I would tryout this technique on a scrap of card and examine its suitability for larger terrain pieces.

The process was thus:

  1. Cut a bit of GW plastic sprue to be the curb
  2. slather the "pavement" portion of the board with wall filler
  3. layer of wall filler for the "road"
  4. repeat until all gaps are filled
  5. sand and add in pavement stone markings
  6. "paint" with ink diluted in rubbing alcohol
  7. repeat until desired color is obtained 
  8. paint on markings, add trash/plants as needed
  9. add pastel chalks
  10. seal


Here is my blurry result.

In person the "dirt" in the gutter is a bit less reddish, and obviously the actual pavement is not blurry!
Ruddy version of the same, where you can see the curb and detritus
I was particularly pleased with how the sponge painted markings turned out, particularly as they took all of 5 minutes to do. Anyway, it seems as if this pavement test is mostly a success; however it is not as quick as one might hope for, say, doing a whole city block of terrain.  Certainly suitable for building a photography set.

Wednesday, April 1, 2015

Terrain

I have been thinking a lot lately about Terrain for wargames. Seeing posts like this one from Eric the Shed, and this one from Whiskey priest do not help.

I have some sort of crazy ideas to have a table absolutely packed with terrain, done up to model train layout levels...  so nearly unplayable and certainly illogical given the frequency of games around here.

On a more practical note, a couple of months ago now, I had a quiet afternoon, and while the kids were sleeping, I got out all of my various "nearly built" terrain pieces.  By nearly built, I mean that they are not really kits, and would require very little to finish up. (so not my large box of unbuilt Cities of Death buildings)

As you can see it is a pretty sizable amount, particularly considering that the board that they are sitting on is ~two foot by three foot.  Mostly various plasticville stuff, with the GW crashed Aquila lander and the old 3rd edition ruins.  I should be sensible and work on finishing some of this stuff instead of dreaming of blocks of art deco flats...