Showing posts with label photography. Show all posts

Wednesday, January 18, 2017

Banana Heads II (Redux)

Third try to get a good picture of this figure.  I used my wife's DSLR camera for this, so you can click to get the picture to be really huge if you like.
alaitoc eldar, paint test, yellow heads
The yellow is not so dirty in real life, or at least I like to think it is not. 

alaitoc eldar, paint test, yellow heads
Side View

I think the lesson here is that I am just not a very good photographer.  Anyway, I only have about 50 of these to paint (and another ~20 of aspects, plus vehicles...), and it was relatively quick.

Monday, September 23, 2013

Photography Weekend

This weekend my wife and son were both out of the house for an evening, so in between caring for the baby and taking care of some chores, I was able to break out the lights and the DLSR camera for a short photography session.
Photo Setup
I retook some recent miniature shots with better lighting (350watts of halogen light, and around 200 watts of incandescent light), took pictures of the night goblins that I just finished painting, and then worked on the pictures using Adobe Lightroom on my wife's new computer.

Here are some comparison shots of the Ork powerfist:

Old on the left, new on the right.  It seems that while the focus is better in the new shot (due to a new method I discovered) the color is better in natural sunlight than with the array of lights, even after correcting in Lightroom.

Similarly, the older picture of the Ork is not as focused, but the color is certainly better in the first shot.

In this next comparison, we have an old shot taken by OTT light, and the new one with the lighting array and manipulated in Lightroom.


I would say that the focus is again better in the new shot, but the colors are not quite right, the red in particular looking a bit too orangy. (I also need to hit these guys with some matte sealer!)

Here is the fellow from the Irony, MT bunch, where you can again see the improvement in focus, and here you can also see an improvement in color, although it is still lacking as compared to having the figure in hand.
I used the Perry Miniatures article on Painting Dark African Skin by Steven May
So in conclusion, it seems like the increased focus is beneficial (particularly for closeups) but that getting the correct lighting is important. When I have time, I will endeavour to take some of these shots again with diffused natural light, which we should have plenty of for the next couple of months.

What are your thoughts? Do you have any photography tricks to share?

Wednesday, July 31, 2013

Irony, MT - Part 1

For my wife's birthday this year, I somehow hit upon the idea of giving her a set of miniatures and rules for western role play. 

Rules were easy, as I went for a hard copy of Go Fer Yer Gun, printed by Lulu. I also managed to get a PDF or the rule book when it was a free item from Drive through Games. This system is based on D&D, and should be pretty easy to pick up.

For miniatures, I went with Foundry figures, sculpted by Copplestone (OW9/2, OW11/8, and DA1/6). At $15 a pack, the Foundry figures were a pretty good deal, although the flat rate shipping was a little harsh, particularly considering that it took longer than expected for them to get to me.  I was pleased with the sculpts, but there were more mold lines that I was expecting, some of which were too difficult to remove.  I also painted a random Artisan figure, which had character, but was less technically accomplished than the Copplestones (particularly in the hands).

I painted the figures predominantly at work during my lunch hour, and had pretty good success with that.  My office gets fairly good light, so it is not too bad for painting. I did run into some technical issues, mostly having to do with the Citadel screw top paints having dried up.  My flesh wash was a solid mass, and the propellant from my DullCote had long since vanished, necessitating a trip to the hobby store to procure more.  I experimented with some new techniques whilst painting these up, including using a sponge for some of the weathering on the clothes, painting reflections on a bottle, and I used the Perry Miniatures article on Painting Dark African Skin by Steven May to inform my painting of this first fellow.

For basing, I tried out grass tufts for the first time, and was somewhat pleased with them.  It seems like the particular set of tufts I had were more irregular than clumped, but I think that the overall effect is good (and quick, which its own sort of good).

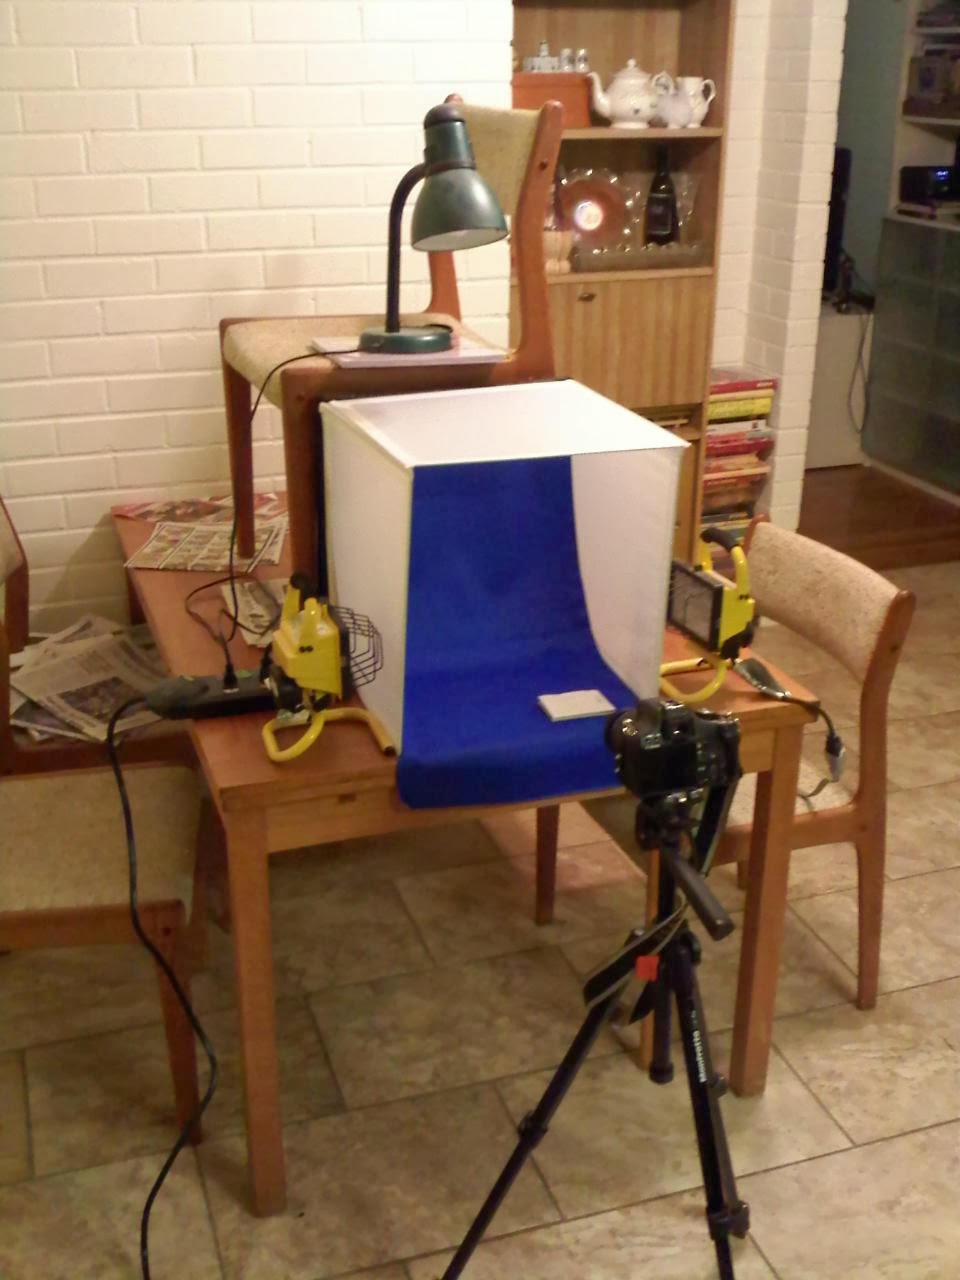
Enough words, here are the first four of the miniatures (out of 13)

  Clearly I need to work on photography, since they are much better "in the hand" than they are showing here.  Limited in this case by taking pictures at night with a cellphone.  More to come, including a map of Irony City, Montana Territory.

Friday, January 25, 2013

Christmas Ork

Click to see how big it can get
Here is my only completed figure for 2012, an Ork I painted to give to my wife for Christmas.  I had good intentions for painting this year, and started out pretty strongly when I was rushing to complete figures for the D&D game that I ran back January... but I barely put brush to figure in the past year, and did not end up finishing anything.

This ork, being a gift, had a deadline, and consequently I was forced to hurry it up a bit. I woke up early every day, and stayed up late every night for a week, realized that I was still behind, and started painting at lunch time at work as well.  The figure is a conversion of the nob that comes in the ork boys box, and consists of something like 36 parts, and a sculpted hat, so it was a bit fiddly to put together.  The peg leg in particular made it hard to balance.  My wife hates Eldar, so I got a spare helmet and made a ripped spinal cord for it, and now he stands on it.

I painted it with my usual mix of various vintage Citadel paints, and some Vallejo as well, using mostly a 00 liner brush I got for $1 at a craft store.  The long bristles were pretty useful in painting in all the freehand work, and allowed me to use thinner paint than I would usually use. The wash was a mix of Citadel black ink, craft paint matte sealer, and Future, and then I painted some of the highlights on top of that.

The overdone base was my wife's favorite part
 

Hopefully the results are worth it.  The base still needs a few bits of grass or flock, but it is otherwise complete.  Unfortunately I  managed to not get a clear shot of the bit I was most proud of... the flaked rust on his power claw.

You can sort of see the effect here
On another note, I really need to work on my figure photography, because now that I see these on the big screen, I notice that parts of the figure are out of focus, and that the figure is not lit as well as it could be.  I used my light box, but with natural sunlight, which seems to have been insufficient.  Look for an experimental photography series sometime in the future...

Tuesday, December 4, 2012

Heeresgeschichtliches Museum Wien

While in Vienna a few months back, we had the opportunity to stop in and visit the Heeresgeschichtliches Museum.  Located in the Arsenal complex south of the Altstadt, this museum has much of the ephemera of the Austrian Imperial Army from the last couple hundred years, as well as items from the Navy and some items from earlier periods.

The building complex itself is beautiful, and while it is currently a bit hard to get to, the train station nearby is being massively expanded, so I expect that it will be easier in the future.

Here are some pictures from the museum.

Outer building of the Arsenal complex

FG 42

Adversaries: American bomb and 88

Volkssturm arm band

Cool display of the whole Imperial navy in miniature

Naval Pistols

FN model 1910s... belonging to the Black Hand 

The car that Arch Duke Franz Ferdinand was riding in when shot

Coat he was wearing when shot

The building is richly decorated, particularly the upper galleries
 

Regimental facings under Maria Teresa
Since we were in Vienna before Austrian National day, they were also setting up for a large army display in the Heldenplatz.  Most of the displays were not finished, but the soldiers were drilling, and some of the heavier equipment was set up already.

 
Vienna was about 1/3 destroyed in the war, and sometimes you can see remnants of that era, such as this flak tower now used as an aquarium:
 
It is always nice when you can make those you defeat in battle erect monuments to your fallen soldiers like this one:

Anyway, Vienna was a great city, and I would like to go back sometime when I have more time to get out into the countryside and see Wagram and other nearby battlefields.

Monday, November 19, 2012

Festung Hohensalzburg

Our next stop in the retrospective tour through Europe is the fortress of Salzburg, known as the Festung Hohensalzburg.  The site looms over the city on the Mönchsberg, and was occupied by fortifications as early as the 1070s, and the major fortifications date from the 1500s.  The fortress was serviced by a cargo funicular as early as 1495, and had another funicular added in the 1890s to bring tourists up to the site. 

Here are a few pictures of the fortress, one of the remaining city gates (Sigmundstor), and the bastion across the river. Clicking should make them bigger.

Tourist Plaza

Capped battlement crenellations on this tower

View from the tower in to the garden

The fortress is pretty high up

Interior wall battlement

Looks pretty... until you see the machicolation above the gateway


Battlement drainage

As you can see, cannon could range the whole city

Hilt of an arming sword

Salzburg was always a most Catholic City

Festung over the town

Catacombs in the mountain side

Sigmundstor, cut through the mountain

Bastion wall watch

Fortress view from bastion

Former cannon port on bastion

Stairs and more stairs up the mountain